コマンドラインからGoogleドライブにファイルをアップする
はじめに
コマンドラインからGoogleドライブにファイルをアップできたら、CIの成果物とかをとりあえずぶん投げておけて便利そうだな、と思って調べたもの。
今回使うツールはこちら。
rclone - rsync for cloud storage
ちなみに、このツールの他にgdriveというのも見つけたけど、Googleドライブのチームドライブに対応してなさそうだったので一旦見送り。
事前準備(Google API設定)
RcloneがGoogleドライブにアクセスする際にGoogle Drive APIを使用するため、事前にGoogle API設定を行う。
Googleプロジェクト新規作成
任意のプロジェクト名で新規プロジェクトを作成。

Google Drive API有効化
APIライブラリより、Google Drive APIを有効化

認証情報作成
RcloneでOAuth認証するための認証情報を作成する。
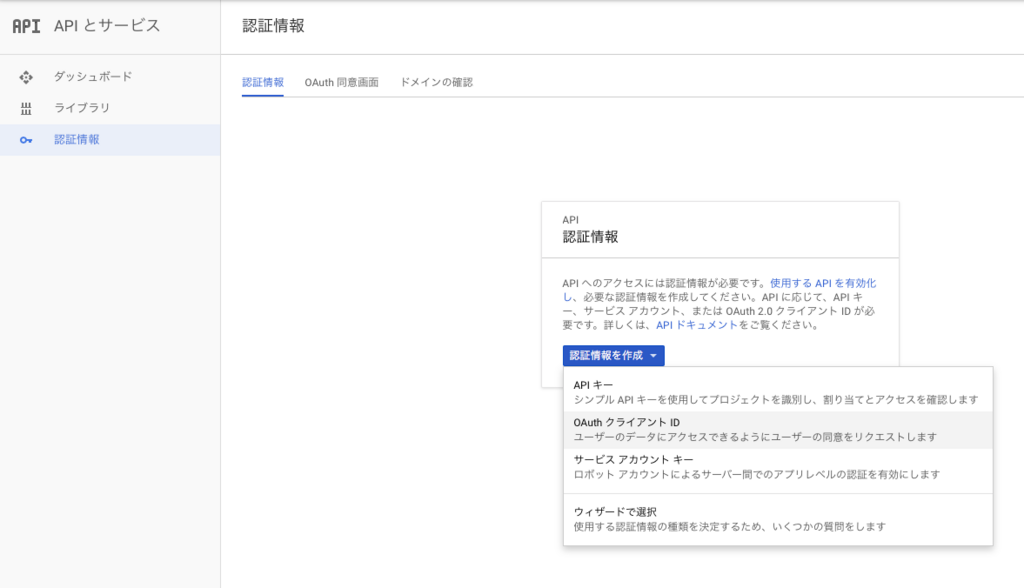
まずは、下記画面でOAuthクライアントIDを作成。

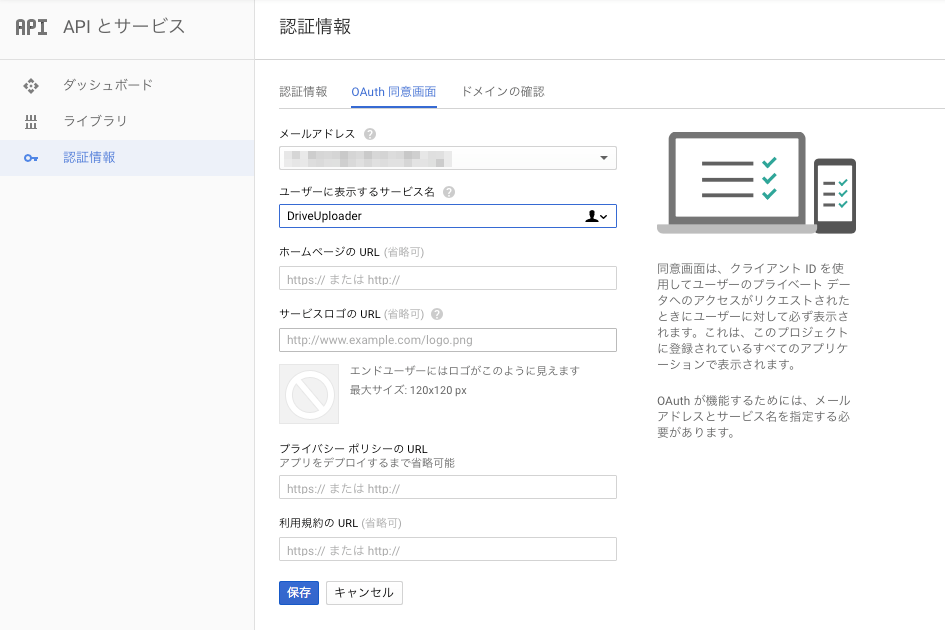
新規の場合、まず同意画面を用意する必要があるので、「同意画面を設定」押下

OAuth同意画面に表示する任意のサービス名を設定

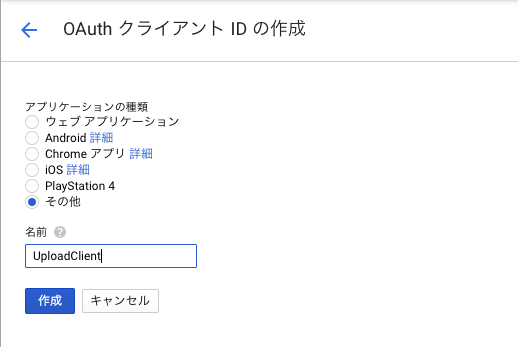
OAuthクライアントID作成画面に戻り、アプリケーションの種類で「その他」を選択しクライアント作成

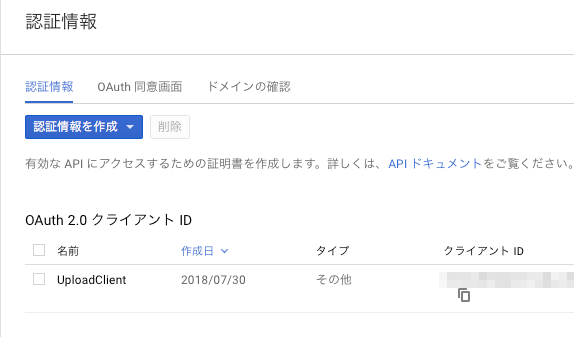
作成できたら「クライアントID」と「クライアントシークレット」をメモっておく

Rclone導入・認証設定
インストール
Homebrewで一発。
$ brew install rclone
各種設定
Rcloneで利用したいストレージサービスの設定を行う。
rclone config を実行することで対話的にストレージサービスの設定を行うことができる。
$ rclone config
No remotes found - make a new one
n) New remote
r) Rename remote
c) Copy remote
s) Set configuration password
q) Quit config
n/r/c/s/q>
新規接続先を作成
まずは接続したいストレージサービスを新規作成するため、↑の選択肢の中から n (New remote) を選択。
接続先には任意の名前が付与できるので、わかりやすい名前をつける。
n/r/c/s/q> n
name> storage
ストレージサービスの種類を選択
以下のようにRcloneは様々なストレージサービスに対応している。
name> storage
Type of storage to configure.
Choose a number from below, or type in your own value
 1 / Alias for a existing remote
   \ "alias"
 2 / Amazon Drive
   \ "amazon cloud drive"
 3 / Amazon S3 Compliant Storage Providers (AWS, Ceph, Dreamhost, IBM COS, Minio)
   \ "s3"
 4 / Backblaze B2
   \ "b2"
 5 / Box
   \ "box"
 6 / Cache a remote
   \ "cache"
 7 / Dropbox
   \ "dropbox"
 8 / Encrypt/Decrypt a remote
   \ "crypt"
 9 / FTP Connection
   \ "ftp"
10 / Google Cloud Storage (this is not Google Drive)
   \ "google cloud storage"
11 / Google Drive
   \ "drive"
   :
(省略)
   :
Storage> 11
今回は 11 (Google Drive) を選択
OAuth認証情報を設定
事前に作成しておいたGoogleAPI認証情報の「クライアントID」「クライアントシークレット」をここで入力する。
Storage> 11
Google Application Client Id - leave blank normally.
client_id> **********************
Google Application Client Secret - leave blank normally.
client_secret> **********************
権限設定
要件に応じたGoogleドライブアクセス権限を設定する。
今回はファイルのアップロードを行う必要があるので、 1 (Full access) を設定。
client_secret> **********************
Scope that rclone should use when requesting access from drive.
Choose a number from below, or type in your own value
 1 / Full access all files, excluding Application Data Folder.
   \ "drive"
 2 / Read-only access to file metadata and file contents.
   \ "drive.readonly"
   / Access to files created by rclone only.
 3 | These are visible in the drive website.
   | File authorization is revoked when the user deauthorizes the app.
   \ "drive.file"
   / Allows read and write access to the Application Data folder.
 4 | This is not visible in the drive website.
   \ "drive.appfolder"
   / Allows read-only access to file metadata but
 5 | does not allow any access to read or download file content.
   \ "drive.metadata.readonly"
scope> 1
ルートフォルダの設定
Googleドライブにアクセスした際のルートフォルダを指定したい場合、ここでそのIDを指定できる。
ドライブの階層が深い場所にファイルをアップしたい場合、いちいちルートから辿らなくてもここでフォルダIDを指定しておけば、そのフォルダがルートとなるので便利。
今回はとりあえずブランクで。
scope> 1
ID of the root folder - leave blank normally.  Fill in to access "Computers" folders. (see docs).
root_folder_id>
サービスアカウント設定
特定のGoogleアカウントによるOAuth認証フローではなく、Googleのサービスアカウントで実行させたい場合、ここでその認証情報を保存する先を指定できる。
今回はOAuth認証を使うのでブランクで。
root_folder_id>
Service Account Credentials JSON file path  - leave blank normally.
Needed only if you want use SA instead of interactive login.
service_account_file>
アカウント認証処理
ここで実際にGoogleアカウント認証処理に入る。
コマンドラインで実行の場合、Auto Configは利用できないので、以下で n (no) を選択。
service_account_file>
Remote config
Use auto config?
 * Say Y if not sure
 * Say N if you are working on a remote or headless machine or Y didn't work
y) Yes
n) No
y/n> n
すると、以下の通りリクエスト認証URLが発行される。
y/n> n
If your browser doesn't open automatically go to the following link: https://accounts.google.com/o/oauth2/auth?**********************
Log in and authorize rclone for access
Enter verification code> **********************
このURLをブラウザで開くと、以下の通りリクエスト許可確認画面が表示されるので、API実行ユーザアカウントでリクエストを許可する。

許可すると、ページ内に認証コードが表示されるので、そのコードを Enter verification code に入力すればOK。
チームドライブ設定
Googleドライブにはチームドライブ機能があるため、そっちにファイルをアップしたい場合はここで設定できる。
y にした場合、そのアカウントが利用できるチームドライブが一覧表示されるので、利用したいものを選択。
Configure this as a team drive?
y) Yes
n) No
y/n>
最終確認
ここまでで設定した一通りの内容が以下のように表示されるので、問題なければy (Yes this is OKを選択して終了。
[storage]
type = drive
client_id = **********************
client_secret = **********************
scope = drive
root_folder_id =
service_account_file =
token = {"access_token":"**********************","token_type":"Bearer","refresh_token":"**********************","expiry":"2018-07-30T16:51:19.421611282+09:00"}
team_drive = **********************
--------------------
y) Yes this is OK
e) Edit this remote
d) Delete this remote
y/e/d> y
ここで作成した設定は ~/.config/rclone/rclone.conf に保存されているので、必要があればこのファイルを書き換えることも可能。
Rcloneを使う
設定が完了できていれば、以下のコマンドで先ほど名付けた名前が表示されるはず。
$ rclone listremotes
storage:
ファイル表示
ls で、指定したパス配下のファイルを表示。
ただUNIX的な ls とは違い、サブディレクトリの中も走査して表示される。
$ rclone ls storage:
$ rclone ls storage:/path/to
ディレクトリ表示
lsd を使うと、指定ディレクトリ配下のディレクトリのみ絞って表示できる。
$ rclone lsd storage:
$ rclone lsd storage:/path/to
ローカルからGoogleドライブへファイルをアップ
ここでやっと今回のエントリのタイトルに書いてあることを実際にやってみる。
単一ファイルのアップ
copy を利用。
$ rclone copy ./path/to/source_dir/somefile storage:/path/to/dist_dir
複数ファイルのアップ(同期)
sync を使って、いわゆるUNIXのrsyncのような形でローカルのファイル状態とリモートのファイル状態を同期させることもできる。
$ rclone sync -n ./path/to/source_dir storage:/path/to/dist_dir # dry-run
$ rclone sync ./path/to/source_dir storage:/path/to/dist_dir
これで、ローカルの./path/to/source_dir の内容がGoogleドライブの/path/to/dist_dirへ同期されることになる。
注意事項
- rsyncで言うところの
--deleteオプションが付いたのと同じ挙動になり、ローカル側のファイル状態が全てGoogleドライブ側に同期されるため、ローカル側に存在しないファイルは削除されるので注意 rclone.confのroot_folder_idである程度下の階層のディレクトリに絞っておけば、ミスった時の影響範囲が少ない(間違えて上位階層からごっそり消しちゃったりしにくい)
その他コマンド
他にもいろんなコマンドやオプションがあるので、いろんな使い方できそう。
詳しくは以下参照。
おわりに
実際はこの仕組みを使ってiOSライブラリをBitriseでビルド、成果物をチームドライブにアップ、みたいな運用を作ったわけですが、その話は追々。
今年のiOSDC 8/31(金)と9/1(土)に参加しまーす。